A Rainy Afternoon with Scraps of Coloured Paper
Arrange leftover coloured paper into a small display with this relaxed, low-cost plan for trying combinations without chasing a polished craft finish.
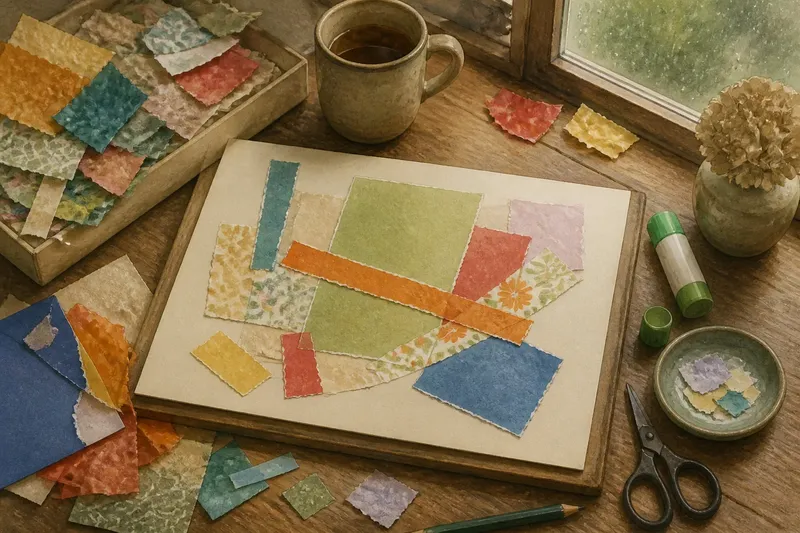
A small coloured paper display can begin with the odd pieces left in a drawer: a torn envelope, a scrap from a gift bag, or the edge of a sheet saved from another project. Spread them on a table and treat the afternoon as a chance to compare colours and shapes, not to produce a perfect craft.
You need paper, a backing surface and a way to hold the arrangement in place. A sheet of old card, a clean cereal-box panel or a sheet of drawing paper will do; use scissors, a glue stick and a pencil only if they suit the materials in front of you. Try these ideas in order, but keep the freedom to change direction.
1. Gather scraps by how they feel
Bring together the pieces that catch your eye, then sort them loosely by touch and appearance. Matte tissue, glossy packaging, textured wrapping paper and plain coloured card all behave differently, even when their colours are similar.
Keep small pieces as well as large ones. A narrow strip can give a broad shape an edge, while a tiny scrap may become the detail that makes two otherwise unrelated colours feel connected. There is no need to remove every crease or imperfect edge; those marks can be part of the display’s character.
If you have many scraps, set aside only a handful to start. A limited selection makes it easier to notice how one colour changes beside another. Leave the rest within reach so you can introduce a new shade if the first arrangement feels flat.
2. Choose a backing that gives the scraps room
Pick a backing that is larger than the pieces you plan to arrange. Plain card offers a firm surface, while drawing paper gives a softer, less formal feel. Reused packaging is another option, provided its printed side or folds will not distract from the colours.
Turn the backing over and check which side looks calmest. If it has writing, a strong pattern or a crease, decide whether that will be hidden by the scraps or become part of the composition. You can also leave the backing visible as a border rather than trying to cover it completely.
For a display that may be moved, place the backing on a tray or a book while you work. This gives you a firm base without fixing anything too soon, and makes it easier to lift the arrangement and view it from another part of the room.
3. Try colour combinations before cutting
Lay pieces down without trimming them. Put two colours side by side, then move one across the backing and see how the relationship changes. A warm red beside yellow may feel lively; the same red beside a muted blue can seem quieter. These are impressions, not rules, so let the actual scraps guide you.
Try one strong colour with several quieter ones, or arrange a few similar shades from light to dark. A scrap with a printed pattern can sit next to a plain colour pulled from that pattern. If the result feels crowded, remove a piece before adding another; empty backing can give the eye a place to rest.
Say you have a pale green paper bag, a strip of orange tissue and a small piece of blue envelope. Place the green near the centre, then try the orange as a narrow crossing band and the blue near one corner. If the blue seems disconnected, shift it beside the green or leave it out; the visible result is a clearer grouping, not a required finished design.
4. Let shape and edge do some of the work
Once a few colour pairings appeal to you, look at the scraps’ outlines. A torn edge can contrast with a neat rectangular cut, and a long strip can lead the eye across a broad square. Move the shapes around before reaching for scissors.
If a piece is too large, fold it temporarily or overlap it with another scrap to see whether a smaller area would work better. To make a test shape, trace around a scrap on the backing with a light pencil, then lift it away and cut only when you are confident about the change. Keep any offcuts; they may be useful as small accents.
Do not force the arrangement into a recognisable picture. A loose cluster, a few bands or an uneven field of shapes can be satisfying to look at without depicting anything. The point is to see what the materials suggest when they are placed together.
5. What should you do before fixing the paper?
How do you keep the arrangement easy to change?
Leave the scraps loose on the backing and take a quick photograph from above. The image gives you a record of a promising version, while the pieces remain free to move. You can also set aside the arrangement and return to it after a short break.
Should you use glue or tape?
A glue stick can suit light paper on a clean, dry backing, while small pieces of removable tape can hold edges temporarily. Try a discreet spot first if the paper is delicate or coated, since adhesive may mark or wrinkle it.
How can you make the display feel balanced?
Step back and check whether one area seems much heavier than the rest. Shift a large piece, add a small counterpoint on the opposite side, or leave open space where the arrangement feels crowded. Balance can come from colour, shape or the amount of backing left visible.
What if the scraps keep curling?
Choose flatter pieces for the main shapes and use curled scraps as small accents, or press them gently beneath a clean book while you continue arranging. Avoid forcing a fragile piece flat if it is likely to split or crease.
6. Fix only the parts you want to keep
When the arrangement feels settled, decide whether it needs to be fixed at all. A display made from loose scraps can be temporary: leave it on the tray, photograph it, or move the pieces into a new arrangement another day. Keeping the trial loose is a perfectly complete outcome.
If you want to secure it, lift one piece at a time and apply a small amount of glue to its reverse, then return it to the position you chose. Smooth from the centre towards the edges with clean fingers or a scrap of plain paper. For a layered arrangement, fix the pieces underneath first and add the overlapping pieces last.
Use the adhesive and backing in a way that suits their labels and manufacturer instructions. If you may want to reuse the scraps, do not glue them down; a few temporary tape loops can hold a display together while still allowing it to be taken apart.
7. Give the display a place that suits its materials
Set the finished arrangement on a shelf, lean it against a wall or place it inside a shallow frame if the backing fits. A bright window can make colours look lively, but direct light may change delicate paper over time. Choose a spot where the display can be enjoyed without needing to be handled often.
Keep any leftover pieces together in an envelope or a small box, grouped loosely by colour or texture. That makes the next session easy to begin without turning every scrap into a permanent possession. Pieces that no longer interest you can go into paper recycling where local rules accept them; coated or mixed-material packaging may need a different destination.
A coloured paper display does not need a title, a frame or a final version. The useful result may simply be learning that two scraps work well together, or noticing which textures you keep reaching for. If you return to this rainy-afternoon paper display later, start with that observation and let the next arrangement take a different shape.